I'll keep this short with more pics.
<life story> I was born in a forest with a garage full of tools. Now that I have my own to play in, it needs to meet my standards.
Before times; the human door was an interior door with rot at the bottom, a cast iron stove that insurance didn't approve of, built in storage that smelled of mouse pee, and wiring sagging into headspace.

Through the partition door (behind the photo above) more storage, a walled off area to the far back left, single pane window, sketchy beam that, turns out, was held in place entirely by gravity. I dig the wall panels and put up with it for the first year.
To budget and better plan out my attack, I modeled the garage based on real measurements. This is the accumulation of this entire project, adding as I went.
Sad state of the sill plate around 3/4 of the structure. It's a double plate made of (likely) untreated 2x4. This is the first place to start, so I ripped off the walls and worked in 8-foot sections.
Sad state of the sill plate around 3/4 of the structure. It's a double plate made of (likely) untreated 2x4. This is the first place to start, so I ripped off the walls and worked in 8-foot sections.

A closer look at the rot. The spray foam I added earlier to deter pests.

I found an old sketch online of a frame used to lift wall sections for this type of work. It did the trick!
Since doing this project in bite sized pieces and unsure of my workmanship, each major step in the structure was permitted and inspected. Due to the sill plate drying out over time, I also went in and re-torqued the anchor bolts months later. Some were even finger loose, so word to the wise. Inspectors may not catch everything and knowing how structures work and react is a good mindset.
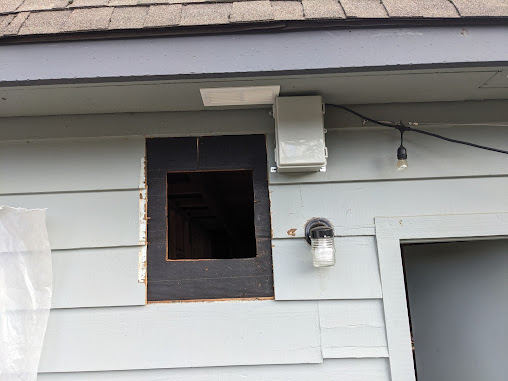
Removed the old stove pipe, leaving a hole in the wall.
To patch, I cut away the siding to expose waterproofing so I can properly overlap new material. Not photographed is the new sheathing and framing behind this hole. Basically plywood stitched on drywall patch style.
Turns out my bitumen tape was mesh, so stapled that on and coated it in bitumen based caulk. It did well and this should be sufficient to keep water off. Not that it's ever a problem with these eaves.
Found the same cedar siding at Dunn Lumbar. Applied paintable caulk between the seams, then primed for paint.
Previous owners left a large bucket of paint, making color matching a non issue (thank you!).
Ripped out the old door and replaced with something nice. This wall was actually out of plumb, but I've determined it's how it was made way back in ~'58. So I had to do some tricky shim work to make the door plumb without it being too visible.
There's proper waterproofing and runoff layering behind the trim, trust me.
Mysterious chimney hidden behind paneling. BTW I tested every suspect material for asbestos; clay chimney liner, concrete floor, fiberglass insulation, WRB in the attic, all clear. However some words of wisdom: Silica dust will do the same and it's unregulated. Mask up!
Demolition was rather fun. Fortunately the chimney didn't go past the roof, so no exterior work needed to be done.
New window! Reframed the window, not because the new one would be a different size, but because the old one didn't have a header above it. The top plate on this wall was doubled as usual plus a 4x4, which I believe was done to act as a header for the whole structure. Yes this means the ceiling is slanted.
Window framing done. You can also see the new joists above. These were added to support the drywall independent of the saggy rafter ties for a flat ceiling.
Exterior view. Properly layered for water intrusion. The window sill also has a slight angle to it that I've seen pros do, should the weatherproofing ever fail. This is a nail fin window, I ain't no fool.
Two ceiling vents added for some high CFM Panasonic fans, for smelly shop work.
Mice exclusion. This was actually the first task to prevent mice from getting in. They had eaten through the rotted sill plate and kept chewing through the spray foam I put in after moving in. Here I dug a trench around the structure and stapled galvanized hardware mesh to the cedar cladding. Bricks and rocks hold it tight against the slab.
Then back filled with dirt and drainage rock. This should also help prevent moisture from wicking into the sill plate and causing more issues down the road.
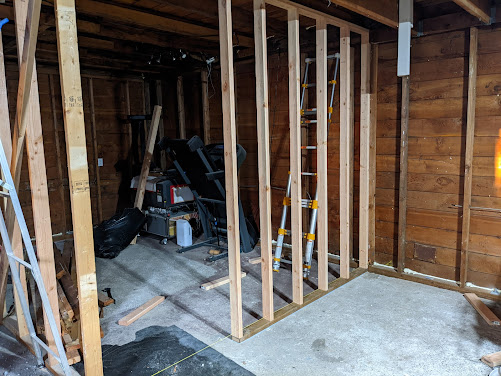
Next is the partition wall rebuild and beam replacement. I have a video showing how sketchy the beam is, but it won't upload. It's that green post and beam in the following image. First I built a support wall and shimmed it to level the ceiling due to the bow of the old beam.
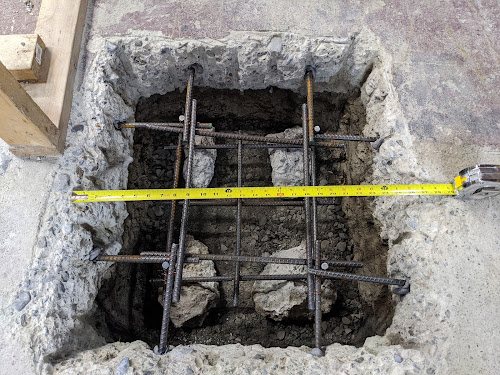
Filled in with high strength concrete. The upper layer has glass fibers mixed in to fight cracking.
Completed wall. It's supported by bracing between two rafter ties using brackets, so should be good and strong.
Architectural grade glulam beam sized and specced by engineers per code. Went ahead and sealed the top and both ends to prevent checking and splits. This thing is over 14 feet long, nearly a foot tall.

Makeshift hoist. Seems dangerous, but kept myself out from under the beam at all times, and added wood under the beam every few feet should the worst happen. Using ropes this way cut the lift weight to 1/4 by lifting one side at a time in increments.
Beam in place. Nailing pattern is defined by the engineer I hired, no shortcuts.
Time for electrical! Hired an electrician to add a 100A panel to replace the 30A. It was actually an old 70A panel, but the wire feeding it was 30A. Rented a concrete saw from Home Depot and made a mess on my nice gate. After he finished adding the circuit, I added a few extra service tubes for internet.

Did the rest myself with guidance from my electrician brother and NEC 2020. Disclaimer: I already knew how to safely work around mains power. Don't hack it!
Mixture of 2 and 4 gang outlets, for a total of 80 individual 120v 20A outlets in the garage. The breakers are all GFCI except car charger, which has it's own fault system. I went back and added nail plates to all studs regardless of hole depth. Mock me, but the worst will happen. All boxes metal and covered in intumescent putty. (yes WAGOs)
More wiring. All holes plugged with intumescent foam.
ChargePoint added. Interior of this wall has another 50A 240v plug for whatever I want (fingers, paperclips, welder, etc)
Insulation is one of those steps that really changed how I perceived the space. With 12-inch rafter ties in the larger area, I got away with R-30. Went with rock wool for better moisture handling than fiberglass. Before this went up, I sprayed all exposed wood with Boracare + anti mold, adding peace of mind. The ceiling insulation has decking in the attic above, so added holes to the ends of the bays for airflow over the batts. These holes are then covered in mesh to prevent bugs from nesting up there. No spiders please.
I did put extra insulation in the partition wall. Didn't need to, but there will be a heat pump in the back room, so I can close the door between spaces and save energy.
Vapor retarder (not barrier) over all exterior surfaces. Also not necessary in this climate, but should help control airflow and again, spiders. Also added multiple X bracing to add stability, another "why not?" moment.
Furring strips on 16-inches to support ceiling 5/8-inch drywall. Why 5/8? Sound deadening, strength, and better with fire. The drywall lift doesn't care if it weighs more, and neither do I.
All sheets in.
Taping layer. Since the shop section will be satin white with very diffuse lighting, imperfections will be less noticeable. The back area will have recessed lighting and grey paint, so I practiced in the shop first.
Satisfied with the walls, and painted (Sherwin Williams), I added a slat wall per my home gym design.Went with a product that had CARB info. Don't want to breathe mystery VOC from cheaper materials.
The lights here are low voltage dimmable. The controls have an access port, per code.
Moved the attic hatch location to the shop, and added ladder access for storage. The gym area only has 2x6 rafter ties, so the 2x12s over the shop is better for storage.
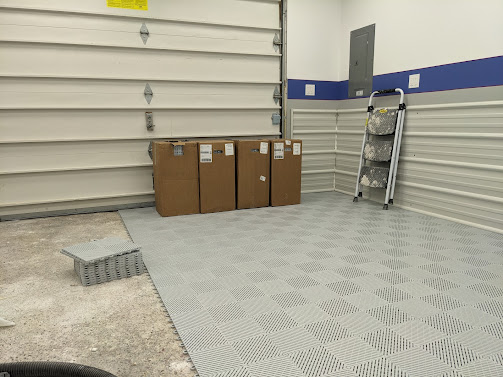
Added a typical blue stripe around the outlets, new non-permemant flooring, and metal wainscoting to protect the drywall. I really don't care the corners aren't clean looking, they'll be covered by items anyway and serves no additional protection.
Shifting gears, here's a stub out for the mini split heat pump in the gym. AC units are crazy expensive to have installed, so after getting my EPA cert, permitted my own DIY install of a nice Mitsubishi Hyperheat unit. I sized it based on a quote from a local installer. Although with the insulation I added, probably should have gone one size smaller for better de-humidification. It's fine.
Purging, pressure testing, and vacuum testing for a week. If this thing leaks, I'll be so embarrassed.
All covered up. Still running fine 6 months later. Although if I do this on the house, the condenser unit will be mounted on a ground pad. It's very quiet, but does vibrate the walls with a very low hum. Though not an issue for the garage.
The nicest room on the property.
Gym all done. Douglas Fir trim hiding ceiling strip lights. I've since cleaned up the wiring under the mirror. Reused my gym flooring from before the renovation.
Clean drywall edges around the window. More oiled Douglas Fir on the sill to tie in the beam, ceiling, and slat wall. Not shown, I added a nice grey window shade for privacy later on. I think I ordered it through Lowe's.
Lighting effect of the trim and mirror without room lights. I looked at custom lighting, but went with color changing Govee products. Some day they will break, and whomever is using it will be happy nothing is buried in the walls. The slat wall comes off in sections. The mirror is actually 3 $14 mirrors from IKEA on a frame I built, so no worried if it breaks, being in a gym.
Recessed lights on the garage. Spaced evenly so one lands over the door. This one's also voice controlled in case I get lost in the yard and my phone's on me...? Looks nice at least.
Last pic; finished shop space. No spiders!


No comments:
Post a Comment