Sunday, December 29, 2013

X-Mas Gifts

On the left is a model I made into a double tipped set of candles that I gave to a friend. The middles are designs I had come up with last year, but lost in my truck somewhere, and I wanted to make some new ones for soap molds for the family. The last one on the right is Hawaiian themed because mother loves her Hawaii. Additionally, I made an eleven foot long cat ramp that extends all the way up to my loft bed. It's in the same style as all the other furniture I've built for my room, except the wood was still a little too hydrated when I varnished it, so the polyurethane reacted with the water and eventually turned from golden to whitish; lesson learned.

Saturday, November 23, 2013

Yoshi Soap

As I was tossing several hundred feet of CAT6 to the back of my closet, I spotted a little rubber mold on the floor, and it hit me, "I forgot about my Yoshi soap!". So I made a few castings, and here's how it turned out. This and the other Nintendo themed soaps in the previous post are measured at 3.5cm either high or long, whichever is longest. I wanna do more Zelda stuff next.

Sunday, November 17, 2013

Nintendsoap

I've been fixating on soap a lot lately. Most of these were sent to a friend because that's how I roll. There's a Yoshi soap in the works, but most of my creative energies are spent at work. Another project I have going is a wood carving thing. I don't carve regularly, but I'm pretty sure all my knives are dull, so this next one could be a while.

Sunday, October 20, 2013

Bobblehead

This is a two part cast that uses a spring to hold one over the other; a bobblehead. I plan on making many, many more.
And a warthog soap, minus the gun.

Friday, September 27, 2013

Saturday, September 14, 2013

Scanning Table

I don't know if people normally build tables specifically for their outdated scanners, but I had plenty of scrap material from my bed and the lights. It's like a bunk bed for a cat, but replace the cat with a scanner.

Sunday, September 1, 2013

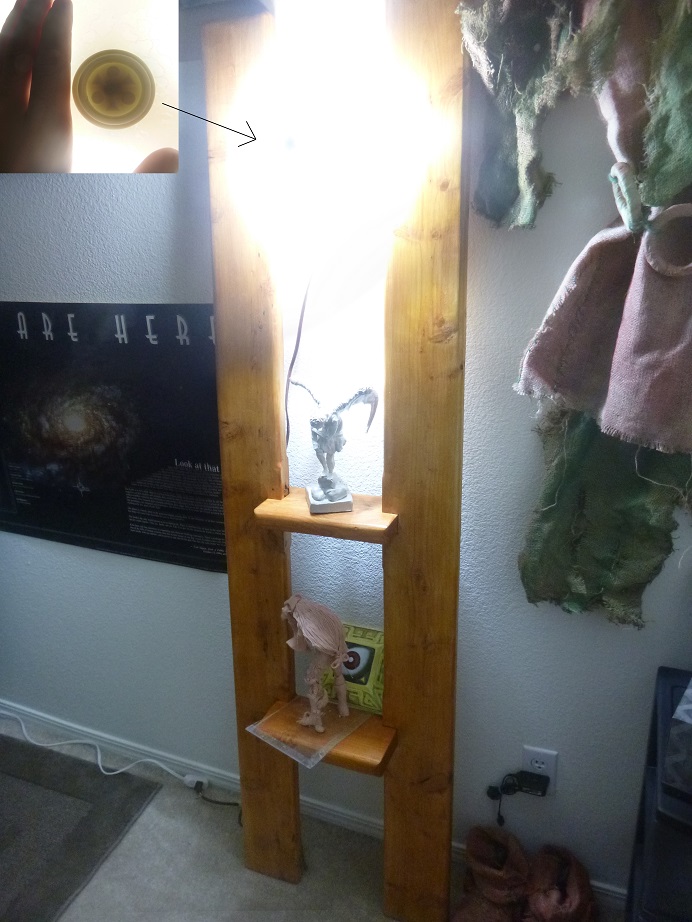
Standing Ceiling Style Leaning Wall Lamp, and shelf

My new place didn't come with a light, so I made one to match my bed. I'll be making another one to go across from it to complete the ambient effect.

Monday, August 19, 2013

Bed Really Finished


Here's my completely finished bed, all rounded and sanded and in its new home. Special thanks to my friend Joe for helping me figure out how to assemble it. And to the neighbors for not calling the police when each of the 20 bolts hit home (loud grinding).

Tuesday, August 13, 2013

Loft Bed

Just realized I could post this. My own custom loft bed. Cost $161 including the varnish and brush that I haven't used yet. Made specifically for certain sized dressers to fit underneath, and it's reversible. Considering I bought the materials yesterday, I should be finished soon.  

Tuesday, July 23, 2013

More Zelda Stuff?

I guess I'm in a zeldaee sorta mood. In the middle of working on a project, I came up with this bookmark and these wallpapers. They just..I tripped over them.


Monday, July 22, 2013

Fi Soap

I was going to make little 'ancient robot' soaps from Skyward Sword, but I had a better idea. This is the first soap, another is cooling off right now. I'm still figuring out where all the bubbles are settling so I can cut vent holes in the mold. There are mistakes with this one, like the hair bits behind her head being cut off and the corners of the pedestal. See you wouldn't have noticed if I didn't say anything. It's just shy of 9cm tall.

Wednesday, July 17, 2013

Clock Done

For viewer's sake, it's done. Nothing more interesting will happen than this final image. I'll probably stain the gaps in the hour hand so they're not so bright. Then I'll get my electronics box and power supply hooked up behind it so there's one single plug coming out.

Tuesday, July 2, 2013

About Time

 Clock faces are about done. I couldn't design the AM/PM indicator to flip around, so it glows as the moon instead of the sun. It's much prettier in person when all the lights are out.
Also, tiny cat soaps. Because.

Wednesday, June 19, 2013

Half There

Slight update from yesterday's post. I still need to grind the edges down so all 24 pieces fit together perfectly.

Tuesday, June 18, 2013

New Project!

I'm rebooting my Clock Town clock project because I'm better equipped in both materials and knowledge to complete it. It'll be 70cm from end to end.

Friday, June 7, 2013

Plasma ShotDONE

Here it is. I roughed it up a bit before clear coating, so there's a fun worn look, but it's easier to see up close. It's pretty strong since there's a metal frame and all the pieces are back-filled with resin. Even the tubes have a steal wire running through them to keep orderly. As you can see after first impressions, the butt end is a little rougher than the barrels because the shape was hand sculpted. Never again. 3D printing all the way, even the big pieces next time. I decided it will not light up, but I may put on some glowing paint on the bits where the lights would be. It's a lousy compromise, but consider that my last prop gun (impact hammer from UT3) was made almost entirely out of cardboard, wax, and a spray can. It's funny, I'm talking like people are listening. lawl

Sunday, June 2, 2013

Paint and Frame

Metal frame with first piece attached. I used urethane foam to hold the handle in place. In a previous post I mentioned using "great stuff" insulation foam for the inside of the handle...well it doesn't become solid without open air, so it stayed in a liquid state. Then it later bulged part of the handle and deformed the plastic shell, so the handle you see in the back is new. Also, everything has a base coat of black and silver.

Friday, May 10, 2013

Primed and Ready ish

I'm slow with this whole prop business. Here are most of the pieces all primed and ready for paint. Maybe it's easier for me to understand just what I've made because it's all grey now and I work in 3d a lot, but it's starting to look pretty good. Just have to finish making the left hand grip, then I'll make a small metal framework for everything to sit on, wire it up, paint it, and just like that, I'll be done. I'd give it a year.

Sunday, April 28, 2013

Cheating

Alright I'm fed up with my poor plaster sculpting skills, so I turned to my printer for help. In the words of a scholar, "see the difference?"

Saturday, April 6, 2013

The Birth of a Part

There it is, beautiful yes? It's hollow so I'm filling it with Great Stuff. Not sure how well it will work, but if it fails to add structural stability, I can always make another because I have the mold. I'm only planning on making one of these guns, so making molds for one-off parts is overkill. But I wanted to have a save point because you can't always "undo" in real life. Great Stuff is not "undo" friendly. What I should have done for a one-off part is take the foam sculpt, coat it in polyester or some other durable but sandable material (instead of plaster), and work with that.

Molding the Obviously-a-Gun Part

This is how big the mold is for the largest part. That's Scar prowling around up there for scale, and he's like what... 6 feet long? Little does he know my hand is under the mold, ready to go all Cabin In The Woods up in here. Which brings me to a good point; polyurethane rubber stinks (really) and is a lot more delicate than silicon rubbers. It also sticks to whatever it touches, leaving me with no choice but to Vaseline everything wherever there's contact with the rubber. So be wary of this cheaper alternative to the real sil deal.

Thursday, April 4, 2013

More Secret Project

 Rubber around some plastered foam pieces. I'm already having issues getting a good cast with these, so I'm trying a different method. After this picture was taken, I covered them in plaster for support.
Plastered piece of foam about ready to be molded. I'll just wait until I figure out the casting process before I do anything that can't be undone.
Some additional, non sculpted pieces that I printed in ABS. These bits will have molds made because they will be a single piece with the foam bits, so I'll just glue them all together, mold, cast, and reassemble the pieces for the mirrored half of the secret thing I'm creating. It's obviously a gun of some sort, I can't hide that. I tried.


Saturday, March 30, 2013

Other Projects In The Works

This is a hand I'm building that will be able to make most poses. So far it's just the thumb so I can work out the bugs. This is a casual project that I'm not entirely sure there's a reason for existing. Hopefully I can get some servos to power the movements some day.
This is a mess of foam that I'm secretly building with. This project is active but isn't going as fast as it can because UPS hasn't yet figured out teleportation. More on this later.
Here is another casual project gone by the roadside for now. This is the back side of a template eye switch that will be vacuum formed...as soon as I figure out the electronics involved. 

Thursday, March 28, 2013

First Post - Mask

My first blog post. This is a project I'm working on, slowly. Like all my projects they take time. As for this one, I need a mixing bowl and whip attachment so I don't ruin the ones meant for food. This is because the sculpt needs to be made into a foam latex mask...which ruins bowls and whips.
If you're a fan of Darksiders, you may remember this as the face of the demon Samael. This was sculpted over a cast of my face using oil based clay, then lightly sponged to give it a skin like texture. I've already made a rubber mold, so next I just need to prepare the foam in that mixing bowl I was talking about.